Here’s some expanded notes on the soft body sim in Blender. I’ve figured out what I think are the basics. I think. Theoretically. Let’s use Mr Jelly Belly as an example mesh.
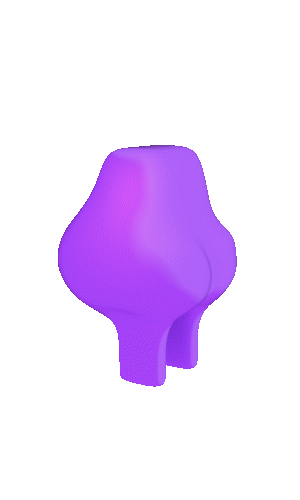
The goal is to create a soft body sim that procedurally jiggles Mr Jelly Belly’s soft parts around without requiring hand-keyed animation.
The soft body dynamics simulation is mainly an interplay between introduced energy, stiffness/springiness and damping (more correctly dampening but whatever).
When the vertices of the mesh are set in motion (through object translation, shape keys on keyframes, armature-based deformation, certain force fields), energy is introduced – soft body simulation treats vertices like a system of physical particles linked by edges and faces. The stiffness/springiness of the vertices, edges and faces determine how much that energy affects the position of the vertices, and factors like damp(en)ing determine how quickly energy is lost from the system. Once energy stops entering the mesh, the verts will try to get rid of the rest of the energy and return to equilibrium (motionlessness).
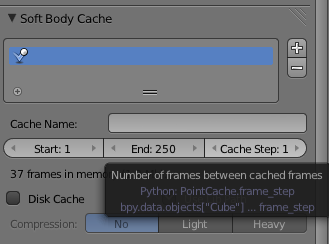
First off, for the love of kittens and puppies, open up Soft Body Cache and change the Cache Step option from 10 to 1. (1 should really be the default.) [EDIT: It is the default now. Hurrah!]
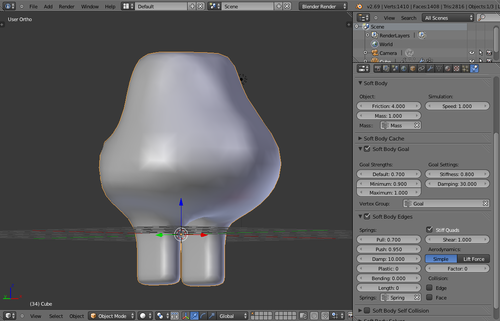
So, first let’s look at the top panel, labelled just Soft Body. Here we have:
- Friction: the viscosity or thickness of the “air” outside the mesh. Low friction (0 – 1 or so) means the “air” has little if any effect on the mesh – it’s thin, so it doesn’t do much. High friction (4 or more?) means that the “air” takes more energy for the mesh to move through if it’s still. This means the simulation won’t be as energetic, because it’s losing energy to the viscosity. and if the “air” is moving (e.g. because of a wind or vortex force field) it imparts more energy to the mesh. A wind force field will have much more effect with a high friction value because of the extra viscosity of the air.
- Mass: As in real life, mass determines inertia: how much energy it takes to get something moving, and also how much energy it takes to make it still. If there’s a mass vertex group selected, this number acts as a multiplier. If there’s no mass vertex group, each vertex is weighted with this number. (Probably.) Mass also interacts with the world gravity setting.
- Simulation Speed: If your simulation’s OK except for the fact it looks like it’s in slow motion, set this number higher than 1. If it’s too quick, set it between 0 and 1.
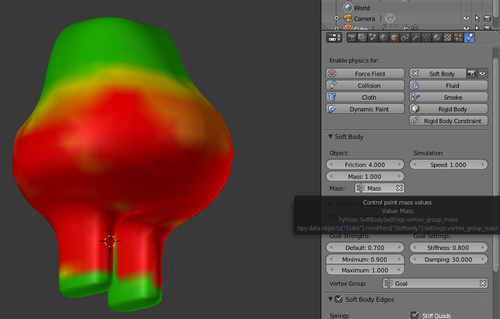
Think of the mass vertex group this way – how much mass is pressing against the vert from the inside of the mesh? How much force is that vert holding back? In the case of Mr Jelly Belly, there’s a lot more mass affecting the underside and sides of the belly than the top of the belly – the weight has sunk into place. Essentially, it’s a gravity thing.
We want Mr Jelly Belly’s spare tyre to be heavier on the bottom so it jiggles more slowly than the top. This is the mass map for Mr Jelly Belly:
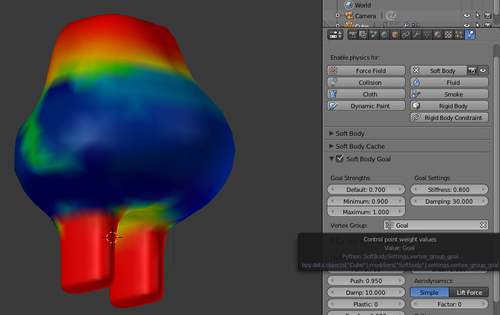
Skipping Soft Body Cache (we’ll come back to it), we come to Soft Body Goal. This is where you control how much the verts attempt to keep the position they hold before the soft body simulation takes effect. This is untickable. Here’s why:
- If you want to run a pure soft body simulation on this mesh, you want the verts to be able to go wherever the simulation says they should. Therefore they don’t need to pay attention to where they were before the simulation, so a goal is irrelevant. In this case, leave Soft Body Goal off.
- If you’re doing armature deformation or shape keys or anything else like that to the mesh and using soft body dynamics as icing on the cake, you want Blender to pay attention and work additively on pre-existing animation. In this case, leave Soft Body Goal on.
We want to control which bits are simulated and which bits aren’t, so we’re going to leave Soft Body Goal on.
Parameters in this section are:
- Default: If there’s no vertex group given, or if a vertex doesn’t appear in the vertex group, this number determines how much the verts stick to their pre-simulation positions. We want some bits to jiggle and some bits to stay still, and we’re going to specify values for all vertices, so we can ignore this number.
- Minimum and Maximum: Scaling values for the vertex group. A vert with a weight of 0 in the vertex group is re-scaled to the value in Minimum, A vert with a weight of 1 in the vertex group is re-scaled to the value in Maximum. Anything else weighted in-between is re-scaled to fit those values. If the verts are flopping all over the place gelatinously, upping the Minimum value to something like 0.9 is a good place to start.
- Stiffness: How attracted are the verts to their pre-simulated positions? In other words, how much do they resist movement? While the mass value per vertex translates into inertia, and the goal value per vertex translates into how much movement is ultimately shown in the simulation, stiffness determines the strength of attraction of all the verts as the simulation progresses. Weak stiffness means the verts will go a lot further afield while stronger stiffness means they’ll generally stay put. Values range from 0 to 1. After some experimentation, 0.8 worked for me..
- Damping: How quickly do the verts lose energy once they get it? Undampened verts (value less than say 2) can wobble for ages. Dampened verts (values up over 20) lose their energy quicker and wobble less. Flesh doesn’t wobble as much as jelly so I’ve got a high damping value in here (30).
Stiff, undampened verts will vibrate at high frequencies like a stiff ruler. Slack (unstiff), dampened verts will wobble a little bit then calm down.
Since we want the belly to wobble around a lot once it gets going but for other parts of the body (like the legs and chest) not to be too affected, this is the goal map (min 0.9, max 1.0). This map lets the belly wobble around as freely as possible in the sim while keeping the red areas where we left them pre-sim.
Both Soft Body and Soft Body Goal deal with external forces.
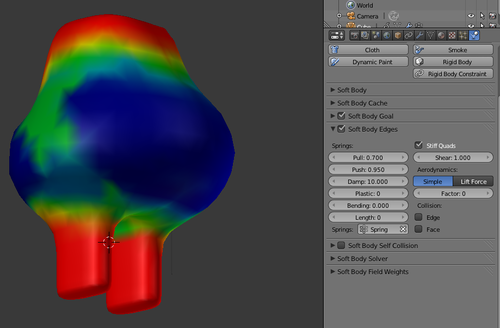
Soft Body Edges, the last panel we’ll deal with in this intro, is all about setting internal forces. (There’s also Soft Body Self Collision, Soft Body Solver and Soft Body Field Weights, but I didn’t touch them.)
Soft Body Edges is truly where it’s at. I can’t think of any situation in which you’d actually untick it because if you do, things tend to fall in a heap. This is because Soft Body Edges is where you set up the internal tensions of your mesh acting through its edges and quad faces:
- Pull and Push: Determine how much edges resist when stretched (Pull) and compressed (Push). These can be wildly different values depending on what you’re simulating. For instance, rubber can be stretched quite happily (low pull value) but doesn’t compress anywhere near as well (high push value).
- Damp: How quickly do the edges lose energy once they’re excited.
- Plastic: Should the deformations affect the mesh’s shape for the rest of the scene? If so, enter an integer (!) from 1 to 100. Wisely set to zero by default. If you are doing a soft body sim of an object dropping with Soft Body Goal unchecked, reaching for this might make your sim a bit more interesting.
- Bending: How much should the mesh resist bending out of shape? This is a sort of distributed stiffness, calculated across neighbouring edges and verts. Turn it up if your mesh is deforming out of control. We’ll come back to this one, actually.
- Length: If you want to shrink or expand the edges by a particular amount, enter the percentage (as an integer) here. Haven’t found a use case for this yet.
- Springs (vertex group): At a guess, a vertex’s membership in this group is multiplied with the Pull and Push values to get a final springiness value. That’s what it seems to do.
- Stiff Quads: An extra layer of mesh stiffness reinforced across opposite (as opposed to adjacent) verts on 4gons. Shear controls the stiffness across the quad.
Since we want the belly to be pretty springy and mobile, it gets a low spring value in the Spring map. Other parts of the mesh should be relatively stiff. This is the spring map I weightpainted for Mr Jelly Belly:
Soft Body Solver contains the very useful Min Steps parameter which controls the minimum granularity of Blender’s simulation. If the simulation appears to be doing stupid stuff like making certain verts stick and then suddenly fly all over the place like a wasp on crack, try cranking this number up a bit.
So, back to that Bending parameter in the Soft Body Edges panel.
Let’s say you’re playing with dynamics. Let’s say you’ve got a complex shape like our good friend Suzanne. Let’s say you’re blasting that complex shape with a very powerful Wind force field, and let’s say Suzanne’s eyebrows are periodically disappearing into her forehead. By cranking up the Bending parameter to 2 or 3, you increase the stiffness across longer links than just adjacent verts. Suzanne’s eyebrows find it harder to bend back because of this distributed stiffness. Basically it’s a way to say “Get the mesh to hold its shapes as they are”.
Dealing with self-intersection this way is preferable to the alternative, namely ticking the Edge or Face boxes in Soft Body Edges, then turning on Soft Body Self Collision and burning enough CPU to fuel a small country.
Anyway. Whenever you play the scene’s animation from scratch, the soft body re-simulates. You can tell it not to simulate until render time by unticking the eye icon next to the “Soft Body” button.
Soft body dynamics can also be placed over the top of meshes being deformed with armatures.
It may help to remember in this instance that the soft body parameters can be animated. For instance, you can nullify the effects of the soft body simulation by having Soft Body Goal’s Minimum and Maximum parameters set to 1 during parts of the scene. Such parameters can be bound to bones and linked using our old friends drivers.
If any given vertex is allowed some simulation, it’s possible for the armature-driven movement to lag severely or even be ignored entirely if the stiffness in Soft Body Goal is set too low.
I wouldn’t call that everything I know about soft body dynamics in Blender, but at least now we have a procedurally animated hypnotic jiggling purple arse to contemplate: