I was mucking around with softbody and then Suzanne’s eyes popped out.
It happens.
(Source: https://www.youtube.com/)
I was mucking around with softbody and then Suzanne’s eyes popped out.
It happens.
I mucked around with the soft body system in Blender today looking for a way to do procedural flesh jiggles and whatnot. I wanted to try to use the Cloth sim as a skin while getting things to move underneath it but couldn’t. I tried the Soft Body sim instead but it was only after a few annoyed hours that I realised i didn’t know how Soft Body simulation worked.
The wiki was OK, examining the tooltips seemed to work, and eventually I built up a picture of how it all works. Since I learn about stuff and forget it pretty easily, this is a series of notes to myself about what to remember when I get back into Soft Body dynamics at a later date. Sort of workflow notes…
Select Mesh object. In vertex groups add one group each for mass, goal and spring. Add “Soft Body” sim. Immediately go to the Soft Body Cache and turn Cache Step down to 1 otherwise you’ll be scratching your head for hours and thinking it’s a bug or something.
Softbody sim happens after shape keys are applied and will read shape keys for cues – twanging the corner of a box does stuff. (In fact, if you forget all this, a shapekey driven cube with a twangy vert at one corner should refresh your memory.)
General concepts:
In top “Soft Body” panel: friction controls air viscosity; mass controls inertia or can be specified vertex by vertex using group. Speed controls simulation speed – speed < 1 = slower and flowier, speed > 1 = quicker and snappier.
Mass vert group probably works best as an inverse subset of Goal group – sort of. Whatever is 1 in Goal is animated upstream and whatever’s less than 1 is progressively being handled by the sim.
Soft Body Cache is self-explanatory.
Soft Body Goal controls how attached the verts or other control points in the softbody sim are to their pre-sim positions. Min/Max scale vertex group, Stiffness.. does something on top of the vertex group – stiffness of any vert = vg value times stiffness via scaling? Maybe. Damping controls the loss of energy as usual.
Soft Body Edges is the most useful panel.
Unsure what spring vertex group controls: says spring strength values in the tooltip. Spring is explained elsewhere as a force trying to keep control points at a distance but how would that value derive from verts? Averaged between normalised vertex group values? Possibly.
Soft Body Self Collision will melt CPU for not much reward. Also only works when Soft Body Edges is running.
Soft Body Solver takes care of itself mostly. Solver Min Step can be turned up for finer granularity in case of highly energetic sim that needs lots of calculation.
Soft Body Field Weights – wiki says only Spherical, Wind and Vortex forcefields actually affect soft body sim. Might be out of date. Dynamics system is still bucketloads of fun for not much effort, just a lot of waiting for stuff to calculate.
Unsolved problems/issues:
I had a hankering to try building a test character using implicit surfaces since that’s what that game Spore used.
Basically instead of describing a surface with verts or NURBS, you use of fields which generate spheres, capsules, boxes and whatnot. When the fields get close enough together, they start to gloop together to create a continuous surface. These objects are known in Blender (and probably in many other 3D apps) as metaballs whether or not they’re ball-shaped.
In Blender at least, metaballs are something of a pain in the arse to turn into characters – you have to parent individual metaballs to individual bones instead of just the usual Armature modifier, and there seem to be weird little rules about what you can and can’t do with them.
There’s an especially weird trap where they are influence-grouped by their name (“family”). One ball becomes the master ball for that “family” and other balls named after it will interact with other members of that family.
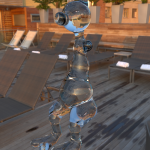
Metaballs of the same family all have the same material and threshold of influence. If you want to put a metaball in a different family, you have to rename the object. You can have multiple metaballs per metaball object – the nose and horns on this guy are all one metaball object.
Metaballs can be positive or negative. Negative balls can sculpt away positive balls. As with many things in Blender, extra fun is often to be found by hitting TAB with objects selected. 🙂
So. Not as nice to work with as verts, but as you can see you can make metaballs move around and look vaguely characterish. Even if they’ve got no arms. (The problem with walk cycles is that you can spend all day tweaking them and I have to go to bed at some point. Hence why this sucks a bit.)
Also, IK necks – how good are they? Damn good. Definitely doing more of those.
Barcelona Rooftop HDR background image from here. (sIBL Archives.)
The constructed language has had a first pass in interlinear text. So instead of rushing into writing down actual words, I’m writing down glossed grammatical structures like ART-3s_SENT [planet]-GOAL [far away] fly-PASTPERF-3s_SENT. This lets me sketch the language at a high level without having to invent words or even choose the range of sounds that make up the words first.
I don’t know how this first language fits together well enough to actually translate all the dialogue in the screenplay yet, so I have to go back and decide that some time this week. I’d probably have figured it out tonight if I hadn’t been messing around with metaballs. 🙂


This weekend I worked on the main character’s abugida a bit as well as doing some technical tests in Blender around replacement animation.
The abugida as you can see is mostly straight lines. I got the idea that it needs to be carved into unwilling surfaces with brute force so sweeping curves didn’t seem to really suit it. So far no part of any glyph takes more than five strokes to write. It’s feeling a lot more like the Korean alphabet than a genuine abugida at this point but then I guess the language I’m going to be spelling out in it isn’t anywhere close to ready yet. I want to start working up a grammar over the next few days based on the dialogue that’s already in the screenplay, figure out the translation in the abstract, then finally drop some actual words into placeholders and see how they all sound.
That’s really the end goal with the conlangs in this series – being both believable and cool to see/hear. In context, the artificial languages and scripts have a single job to do: sell the notion of richness in the universe of the story. Once they sell that notion, further polish is pretty much unnecessary. If I don’t need a word for “microchip” or a compact syntactic device to indicate that something is possibly to blame for something else, I won’t invent it. No point. Too much else to do. 🙂
So that was yesterday. Today I was feeling a bit under the weather but I loaded up Blender and had a mess around anyway.
The technical tests were mainly to get an idea of how I might go about doing replacement animation. Replacement animation is used extensively in limited animation and stop-motion but not so much in CG. The classic use for it is lipsync in stop-motion with a non-malleable medium – instead of moving the character’s face on a tiny little armature, you just whip one head/face off and put on another to get a different mouth shape for the next frame. In Blender.. well.. I’ll get back to you how it’s possible. But it is. Probably. 🙂
And if it isn’t, well.. I’ll figure something out. It’s certainly not coming easily.
I tried using the Boolean modifier to link two shapes together but it’s honestly unpredictable and didn’t really play well with the Armature modifier. The objects would randomly disappear one at a time based on rotation. Very weird.
I tried hooking vertices together as an experiment but that didn’t form a nice continuous seam, especially not when the Subsurf modifier put its two cents in.
Finally i tried Shrinkwrapping one set of verts to another but there’s not a continuous mesh anymore – annoying joins ahoy. You can see one pretty clearly starting at the bottom corner of the eye and curving around the cheek.
The end result of these tests is that I need to have more tests. That’s what tests are for.
There’s a slight tweak to the plan now: it’s still going to be a series of shorts made more or less in story order. I’ll generally be attempting to work in ascending order of difficulty with chosen technical targets to achieve as I go.
I’m in pre-production on the first short now. I’ve got soft script lock – the assets (characters, sets, etc) are pretty much set even if the dialogue isn’t. It’s far enough along to allow me think about production design, conlangs and conscripts, character design and other development/pre-production concerns alongside dialogue polish.
Production design and art direction in particular are kind of daunting. I’m not a trained designer so instinctively that makes me want to work with as few elements as possible – at least at first. The coming to me in disjointed abstractions – concrete, dug-out rock and frosted glass/plastic are a start. Rounded corners. I want something iridescent in there as well.
I’ve been researching architecture, specifically high-density living. I’m casting around for somewhere high-tech but not extravagant but not derelict to put my main character as a living space. I might find more inspiration in Japan or maybe Korea than Hong Kong – the clutter in some of those little apartments in HK is utterly amazing.
To give myself a better sense of what virtual materials I’ve got to work with and what sort of rendering times I can expect if I use them, I’m jumping into the Cycles rendering engine and either brushing up on procedural texturing or just generally playing around. (Speaking of Cycles, Blender 2.69 is in release candidate phase.) I guess materials and textures fall under post-production moreso than pre-production, but if something’s utterly impractical because it means I’m waiting 30+ minutes per FHD frame for rendering, I’d prefer to know ahead of time. Also, discovering cool new things that the technology is capable of is often inspiring in and of itself.
Like knowing I can get nifty procedural iridescent insect chitin without a huge amount of waiting, that’s pretty cool.
The conlanging – language construction – is off to a fairly casual start. The first word I made up for the main character to say is trr. It’s his “contemptful noise” equivalent of pft because he can’t say pft because he hasn’t got lips that work like that. The nice thing about doing the voice work myself is that I don’t have to train an actor how to do a uvularised voiceless alveolar plosive with lateral release – basically a cross between a T, an L and hocking up phlegm. It’s hard to even write using IPA – probably tχˡ comes close – so a tailor-made abugida is in the works too. So far I have a general idea of what I’m doing – I have a symbol for the letter r in onset, nucleus and coda positions. I can thus write the hypothetical word *rrr. Very useful.
So yeah, the next couple of days will be reading up some more about production design, doing another pass on the script to make it funnier, researching compact living spaces, sussing out procedural materials/textures in Cycles some more, and generally trying not to lose too much sleep.
Finally, have a picture of a mulgara.